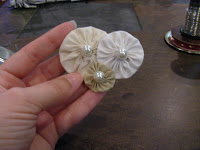
Yoyos have been around forever...I think. My mom taught me how to make them and her grandmother probably taught her how to make them. Craft stores sell round plastic guides but this method is less complicated and cheaper. You will want to put a yoyo on everything once you see how simple they are to make.
What you will need for this project:
3 different sizes of circles to trace, 3 colors of fabric, scrap felt, pin back, 3 pearl beads, needle & thread, glue
To get started you will need to trace your 3 circles of various sizes to use for the yoyos and cut them out. Also, you will need to trace 2 more circles onto the scrap felt, this will be used for the back of the pin. I make those circles slightly smaller than my smallest yoyo circle.
Now you should have 3 circles to make your yoyos out of and 2 felt circles. We will start with the largest yoyo circle first. You will need a needle and thread now. I try to choose a thread color that matches the fabric so that it will not stand out. Knot the end of your string and start with your needle on what will be the inside of your yoyo circle.
At this point I make another knot around my first knot so that when you pull your yoyo tight your original knot won't come through the fabric. This will be the inside of the yoyo so make sure you can see the knot on this side. Continue this in and out method until you reach where you started, with the thread coming through this side.
Now pull your yoyo gently but making it tight. Once your yoyo looks like this put your needle right through the center to knot what will be the back.
Take one felt circle to attach your first yoyo. You can go through the center of the yoyo a couple of times to secure it to the felt. The other 2 yoyos are smaller so I typically don't leave much room on the felt for them and the yoyos will overlap that way.
Now you can add your first bead. The bead holes are not very big so I just put the thread through it twice to make it more secure on the yoyo and knot the back.
Now you are ready to continue the same process for the medium and small sized yoyos. For the second and third yoyos I make a small stitch underneath to secure them to the bigger yoyo.
Once you have attached all three yoyos and pearl beads you will need to attach the pin to the back. All I do is start with the middle hole and work around the pin back until I have put my thread through each hole twice to secure it.
The back of your pin probably looks very messy at this point...hence the second piece of felt! I usually lay the second felt circle over the pin to determine where to cut my holes for the clasp part of the pin to go through. Open the pin and apply some glue before you attach your second piece of felt. This will give the back of your pin a more finished look.
You should now be left with a chic yoyo pin that your friends will be begging you to make for them.
Here are a few other ideas you could use, if pins are not your thing...
Thanks for stopping by!


